Monday, January 10, 2011

ADF Model: Different Date Effective Update Modes and behavior with Examples


When it comes to date-effectivity, the tricky part is date-effective updates to the rows. It's not as simple as updating non date-effective rows. You need to know the basics of date-effectivity like what is an effective date and how it impacts search, create and update operations on date-effective records. Here, we're going to discuss different date-effective update modes available in ADF 11g and their behavior.

All the date-effective update modes are defined as constants in oracle.job.Row class as any kind of effective dated operation is performed on a row itself. Before going into details, let us take an example to explain the concepts. For example, we'll take the same example of 'Job' date-effective object and explain different date-effective update modes available. Sample application having the required code to perform the DE update operations can be downloaded from here.

The following DE update modes available in Jdeveloper 11g:

1. EFFDT_UPDATE_CHANGE_INSERT_MODE: When an effective dated row is updated in "change insert" mode, the modified row is end dated on the effective date and a new row is inserted that fits between the effective date and the start date of the next row in the effective date time line.

For example,  if the Job with JobId 100000020529001 has the following effective-dated row


From the above data, you can see that the details of the job 'Apps Engineer' from 01-Jan-1990 to 31-Dec-4712. And, for example if we want to increase the salary ranges of this job to MinSal=25000 and MaxSal=35000 from 01-Jan-2011 onwards. To achieve this, we need to end date the existing row at 31-Dec-2010 and create a new record for the job from 01-Jan-2011 to 31-12-4712. For such cases, we use this EFFDT_UPDATE_CHANGE_INSERT_MODE.
After updating the above job record with effective date 01-Jan-2011, the resultant rows will be as below:

Again, if we want to update the MedicalCheckRequired attribute to 'Y' effective 01-Jan-1950 (till 31-Dec-2010), we need to update again with effective date 01-Jan-1950.
 After updating, the resultant rows will be:


2. EFFDT_UPDATE_CORRECTION: When an effective dated row is updated in "correction" mode, the effective start date and effective end date is left unchanged. We generally use this correction mode to correct the existing data of a single date-effective record (Correction mode won't create a new row, it'll just correct/modify the existing date-effective record data).

For example, let us take the same above 3 date-effective job records and if I want to correct the JobLevel of the Job record [100000020529001,01-Jan-1900,31-Dec-1949] to 1 from existing value 2, we need to correct the record in EFFDT_UPDATE_CORRECTION mode. For correction, we can use any date between EffectiveStartDate and EffectiveEndDate as the effective date.
 After correction, the result will be as follows:


3. EFFDT_UPDATE_MODE: When an effective dated row is updated in "update" mode, the modified row is end dated on the effective date and a new row is created with the changed values.

For example, let us continue with the same above 3 rows and I want to update the JobName to 'Apps Specialist' from 'Apps Engineer' effective 01-Jan-2015, we can use EFFDT_UPDATE_MODE.
After updating in UPDATE mode, the resultant rows will be:

Here, one thing that we need to keep is that EFFDT_UPDATE_MODE works only for the last date-effective row. The reason is that this mode will always create the modified new record till EOT(31-12-4712) starting from the given effective date. i.e., if we try to update the row [100000020529001,01-Jan-1900,31-Dec-1949] with effective date 01-Jan-1925 in UPDATE_MODE mode, it'll try to create the new record [100000020529001,01-Jan-1920,31-Dec-4712] which will result in overlap with the existing record [100000020529001,01-Jan-1950,31-Dec-2010] and throws exception saying 'the date effective operation will result in gaps or overlaps'.

4. EFFDT_UPDATE_OVERRIDE_MODE: When an effective dated row is updated in "override" mode, the modified row is end dated on the effective date and the start date of the next row in the effective date time line is set to effective date + 1 day.

For example, let us continue with the above 4 date-effective rows, and if we want to move the EffectiveStartDate of the Job row [100000020529001,01-Jan-2015,31-Dec-4712] to 01-Jan-2013. i.e., we want to make the 'Apps Specialist' job title applicable from 01-Jan-2013 onwards instead of 01-Jan-2015. And, you can also set/change the other attributes for the resultant updated row [100000020529001,01-Jan-2013,31-Dec-4712] (for e.g., I'm setting the JobLevel from 2 to 3).
After updating the above rows with effective date 01-Jan-2013 in EFFDT_UPDATE_OVERRIDE_MODE will result in the following rows:

From the above table, you can observe that EFFDT_UPDATE_OVERRIDE_MODE didn't create any new rows. It just moved the existing ESD to the passed effective date.

5. EFFDT_UPDATE_NEW_EARLIEST_CHANGE_MODE: Updating in "new earliest change" mode is supported only in Multiple Changes Per Day (MCPD). MCPD entities are the entities that support multiple date-effective updates on a single day. We're not covering this mode in this post as it would be out of scope of this post.

Here is the method that I wrote to accomplish all of these DE update operations with different DE update modes (download the sample application for to find the method references used in the below code).

In the above method, we're actually getting the Job row effective as of the passed effective date(this will make that effective-dated row as current row) and then performing date-effective update operations basing on that row.

Instructions to run the sample application:
1. Create the required tables for illustrating date-effective operations executing the sql script downloading from here.
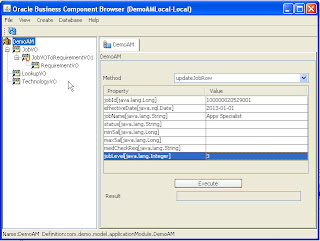
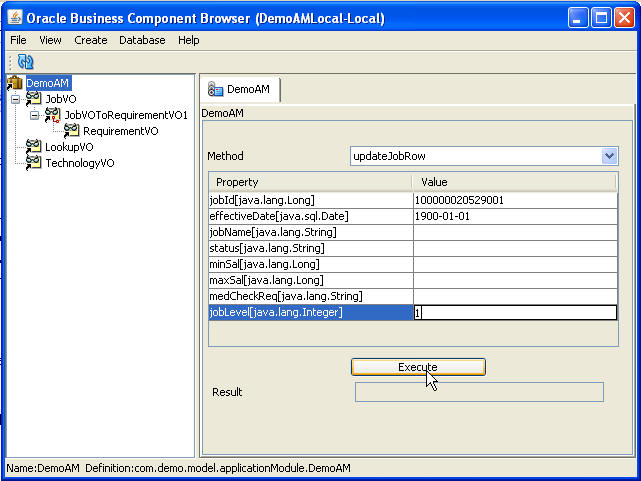
2. Unzip the sample application and, run the DemoAM. Input JobId, effective date and other attributes you want to update and click 'Execute'.
3. Change the date-effective update mode in method 'updateJobRow' each time you want to change the update mode(right now it's hard coded to EFFDT_UPDATE_CHANGE_INSERT_MODE), rebuild and continue. You can find the screen shots above how to provide input in AM Tester.
4. Query the DB to find the updated rows.

Enjoy!!!


Read more: Oracle ADF - Tips and Techniques: ADF Model: Different Date Effective Update Modes and behavior with Examples http://www.adftips.com/2011/01/adf-model-different-date-effective.html#ixzz0tONlNb3v

ADF Model: Different Date Effective Delete Modes and behavior with Examples

After learning about different Date-Effective update modes available in ADF 11g and their behavior, now let us move to date-effective delete modes. Understanding and using different DE delete modes also little tricky. Please go through below explanation of different DE delete modes along with examples.


All the date-effective delete modes are defined as constants in oracle.job.Row class as any kind of effective dated operation is performed on a row itself. Before going into details, let us take an example to explain the concepts. For example, we'll take the same example of 'Job' date-effective object and explain different date-effective delete modes available. Sample application having the required code to perform the DE delete operations can be downloaded from here.

The following DE delete modes available in Jdeveloper 11g:
1.EFFDT_DELETE_NEXT_CHANGE_MODE: When an effective dated row is deleted in "delete next change" mode, the end date of the row is set to the end date of adjoining row and the adjoining row is deleted.
For example, if the Job with JobId 100000020529001 has the following date-effective rows,

And, if the current row is [100000020529001,01-Jan-2011,31-Dec-2012] (or if the current effective date falls in the range of 01-Jan-1900 and 31-Dec-2012) and if we want to delete the next date-effective row i.e., [100000020529001,01-Jan-2013,31-Dec-4712], we'll use EFFDT_DELETE_NEXT_CHANGE_MODE.
After deleting the row in EFFDT_DELETE_NEXT_CHANGE_MODE, the resultant rows will be:

2. EFFDT_DELETE_THIS_CHANGE_MODE: When an effective dated row is deleted in "delete this change" mode, the current row is removed.
For example, let us continue with the same above 3 rows and if we want to delete the Job Row [100000020529001,01-Jan-1950,31-Dec-2010], we need to make this row as current row (i.e., the effective date will be between 1-Jan-1950 and 31-Dec-2010) and delete the row in EFFDT_DELETE_THIS_CHANGE_MODE.
 After deleting the current row in EFFDT_DELETE_THIS_CHANGE_MODE, the resultant rows will be:


3.EFFDT_DELETE_MODE: When an effective dated row is deleted in "delete" mode, the end date of the row is set to the row's effective date and all the future rows for the same key values are deleted.
For example, let us assume that we have the following 4 date effective rows for the job with JobId 100000020529001

And, if we want to end date the 2nd row i.e., [100000020529001,01-Jan-1950,31-Dec-1974] at 01-Jan-1960 and want to delete all the future rows, we'll pass the effective date 01-Jan-1960 and use the mode EFFDT_DELETE_MODE.

After deleting the rows in EFFDT_DELETE_MODE mode, the resultant rows will be:

4.EFFDT_DELETE_FUTURE_CHANGE_MODE: When an effective dated row is deleted in "delete future change" mode, the end date of the row is set to the end of time and all the future rows for the same key values are deleted.
For example, let us assume that we have the following 4 date effective rows for the job with JobId 100000020529001
And, if we want to delete all future date-effective rows starting from 01-Jan-1975, then, we need to make the row [100000020529001,01-Jan-1950,31-Dec-1974] as current row (or make effective date between 01-Jan-1950 and 31-Dec-1974) and delete the rows in EFFDT_DELETE_FUTURE_CHANGE_MODE. This will delete all remaining future rows and end date the current row i.e., [100000020529001,01-Jan-1950,31-Dec-1974] till EOT(31-12-4712).
 The resultant rows after deleting the rows in EFFDT_DELETE_FUTURE_CHANGE_MODE will be:


5.EFFDT_DELETE_ZAP_MODE: When an effective dated row is deleted in "zap" mode, all the effective dated rows with the same key values are deleted.
For example, let us assume that we have the following 4 date effective rows for the job with JobId 100000020529001
And, if we want to delete all date-effective records of this job, we need to use EFFDT_DELETE_ZAP_MODE. Effective Date won't make any difference in this mode as it'll delete all existing date-effective records.

After deleting the rows in Zap mode,  all the date-effective rows got deleted:


Here is the method that I wrote to accomplish all of these DE delete operations with different DE delete modes (download the sample application for to find the method references used in the below code).

In the above method, we're actually getting the Job row effective as of the passed effective date(this will make that effective-dated row as current row) and then performing date-effective delete operations basing on that row.

Instructions to run the sample application:
1. Create the required tables for illustrating date-effective operations executing the sql script downloading from here.
2. Unzip the sample application and, run the DemoAM. Input JobId, effective date and click 'Execute'.
3. Change the date-effective delete mode in method 'deleteJobRow' each time you want to change the delete mode(right now it's hard coded to EFFDT_DELETE_THIS_CHANGE_MODE), rebuild and continue. You can find the screen shots above how to provide input in AM Tester.
4. Query the DB to find the resultant rows after the delete operation.

Enjoy!!!


Read more: Oracle ADF - Tips and Techniques: ADF Model: Different Date Effective Delete Modes and behavior with Examples http://www.adftips.com/2011/01/adf-model-different-date-effective_02.html#ixzz0tONKUHLm

Sunday, January 9, 2011

Got to Love Cascading LOVs in ADF

"You've got to love our cascading LOVs" was the title of an email from Maiko that pointed to a long and complextutorial that shows how non-trivial implementing cascading lists is when you use ExtJS, Hibernate and Spring. You basically end up writing over 300 lines of code in a mixture of languages including java, javascript and json.

This is indeed one of many areas where you can clearly see the advantages that ADF gives you with a declarative development approach.
Check out this little demo that shows how you build this type of cascading lists with JDeveloper and ADF. The interesting point to note is that a single SQL statement is the only manual line of code you end up writing.
This is why we believe that visual and declarative is good.
By the way, if you prefer written instructions for this, you can use either Steve's Article or this part of the ADF BC tutorial.

ADF Faces Dynamic Tags - For a Form that Changes Dynamically

There is a dynamic form and a dynamic table, both read the meta-data of the component you want them to display and create JSF components on the page to show those at runtime.
The following demo shows the basics of how to use them.
We are creating a method in our Application Module that changes the definition of a view object to be based on a provided SQL statement.
Then we bind that VO to our page using the dynamic Form component.
And voila - you'll give the SQL, we'll show the data...
Two notes:
The vo.executeQuery call in the AM method is redundant in this case. The view will be queried when you navigate to the page without this call also.
Dragging a data control as a dynamic table should result in a code that looks like this in our JSF:
<dynamic:table value="#{bindings.v1Iterator}" id="t1"/>
If it doesn't it might be due to a bug in the current JDeveloper version where a regular table is used instead - should be fixed in the next patchset.


Saturday, January 8, 2011

Internationalizing Strings


i18n1.png

By default, "commandButton 1" is the name that this button will display.  Now you can change this Text to be a value from your resource bundle and you can also define an AccessKey, something like "Close" with "C" will name your button "Close" with the "C" underlined as your accelerator.  However, if someone later translates "Close" to a language where "C" is no longer part of the new word, then your "C" AccessKey won't work.  What to do? 
Use the TextAndAccessKey field instead.  Click on the little down arrow next to the field and select "Select Text Resource..."
i18n2.png

Then enter your desired value with the AccessKey directly in the string:
i18n3.png    

By using "&" before the letter "C", you are asking that "C" be the AccessKey.  JDeveloper will automatically underline the "C" for you and provide accelerator functionality.  Now if someone were to translate "Close" to another language, they would see that "C" is the AccessKey and they could pick a new AccessKey and not lose the accelerator functionality that JDeveloper provides.

Target Unreachable, identifier row resolved to null !

SEVERE: Server Exception during PPR, #1
javax.el.PropertyNotFoundException: Target Unreachable, identifier 'row' resolved to null
at com.sun.el.parser.AstValue.getTarget(AstValue.java:xx)
at com.sun.el.parser.AstValue.isReadOnly(AstValue.java:xxx)
at com.sun.el.ValueExpressionImpl.isReadOnly(ValueExpressionImpl.java:xxx)
at


Have you ever seen the above exception while running the web application built on ADF? Apparently, this exception doesn’t communicate much on the root cause and noticed that developers search in dark to find a solution.

This article discusses couple of possible reasons for this error.

Incorrect Key definition for ViewOject

Consider the classic Employee - Department example.
Below diagram shows the association between Employee and Department .


Please note that Emp has Empno as Primary Key(PK) defined and Dept has Deptno as Primary Key.

Let us try visualizing User Interface for Employee. An Employee can belong to a specific Department. So let us try defining a List Of Values for the department name (Dname), which may help the user to select a valid Department for the Employee. Note that Dname doesn't belong to Emp, so we may need to join Emp with Dept based on Deptno. It means that EmpView is expected to have these two entities mapped. This can be done easily using JDeveloper by editing ViewObject and shuttling the entities based on the association between them. Now the EmpView(Employee View Object) look like as shown below. Please note that prior to Jdeveloper 11g R1 , the above action used to set Detno1 also as a one of the Key attribute in the EmpView. Wrong key setting by a developer may also trigger the same erroneous scenario. Rest of the article is based on the assumption that EmpView has two Keys defined, Empno and Deptno1(Deptno1 is from Dept entity). Please note that Deptno1 is wrongly set as key for this use case. We will see now how this incorrect key setting causes issues at runtime! Read on...


Next step is to define a LOV on Dname. If you are not familiar with LOV component then please go through the Fusion Developer's Guide for Oracle ADF . Now create a jsf page, drag and drop the EmpView as an editable table on the page. Let us see what happens when user selects value from the department( Dname ) LOV at runtime. Whenever user selects a different value from Dname LOV, Dname gets modified to reflect the newly selected value. Along with this "Deptno1" is also subject to change as both are from same View Accessor Row. Remember that Deptno1 is a one of the Key attributes (wrongly) defined for EmpView. So effectively key is getting modified here for a specific row and model layer fails to identify the row from cache thereafter. Next time onwards whenever user clicks on LOV or other fields which needs interaction with model, he may get the error: Target Unreachable, identifier 'row' resolved to null.

Solution

Solution is to remove the Key Attribute defined against Deptno1 column in EmpView. Once done this change, next time onwards, selecting value from LOV never causes Key attribute to change. So all works well as expected.


Updatable Primary Keys

In this scenario primary keys are expected to be entered by the user. User can amend the PK values while creating or editing a record. This may result in 'Target Unreachable' exception under certain circumstances as explained below.

Let us revisit our classic Employee - Department example to illustrate this scenario. Create table on jsf page based on the EmpView. Please note that Empno is updatable primary key here. Keep autosubmit="true" for key field of this table i.e. Empno. Now assume a use case where Manager field needs to be auto populated based on the value entered for Deptno. Obviously this makes us to set autosubmit="true" for Deptno field. Create new record on the table by calling ViewObject::creatinsert. As the PK for this new record is null initially, framework would go and create transient keys for the record for internal use. Once the new (empty) record is displayed on the table, user can key in values. As stated earlier, user is expected to key in values for primary key in this specific case. At this point, PK set by model layer (auto generated transient attribute) may be different from what is being displayed on the UI. So user amends Primary Key attribute, then enter value for Deptno and tabs out. Oops, You may see 'Target Unreachable' exception at this stage.


The reason is view layer passes the updated keys to model to find the row, but model knows only row with dummy transient attributes. Obviously search for rows fails and hits the above error scenario.

Solution

There are two possible work abounds for this issue. Please note that this issue is being tracked as an 'Enhancement Request' by ADF team. Once this is done below mentioned limitation are no longer valid.
1. Don't use natural primary keys in the above scenario, instead use surrogate key and let the system generates the value based on DBSequence. It implies that primary key for the record will never change during the transaction.

2. If the use case permits, don’t use auto submit for all the fields of the record. So there is no need to find the rows while editing. Here, we are just avoiding the error condition, though bug still live behind the screen.

PS: The above-mentioned 'erroneous scenario' may occur in all cases wherever user modifies Primary Key. One example could be the case where 'return value' from LOV is being mapped to Key attributes of row. In this case, as and when the selection changes for LOV, key attribute gets modified and which effectively causes the above exception.

Bookmarking Taskflows in ADF / Accessing ADF Taskflows by URLs

The problem

I need to bookmark or deep link a page in an ADF application, either to save a link to the page or share the page by email or other means. Unlike a normal web-app, JSF does not play well with bookmarks, but ADF comes bundled with (somewhat limited)support for doing this. This sort of a requirement is common when we need to include an application link in a generated email report to enable to user to see additional interactive information or to secure the information itself by sending not the report but just a link to it, so that he user will authenticate before accessing the information.


The solution

ADF has bookmark support for pages in the unbounded task flow, so we take a look at how the bookmark attribute works and how to use it. The built in support has limitations in that only pages in the unbounded taskflow can be bookmarked, and at times we would want pages within a bounded taskflow to be bookmark-able, so we take a look at a method for bookmarking/deep-linking a page within a bounded taskflow.


Bookmarking in the unbounded taskflow

The following example of the out-of-the-box support for bookmarking is based on the standard Oracle documentation here.

You start out with a standard app, in this case a page that lists  the departments in the HR schema and a second page that displays the details of  the staff in a given department. We need to make this second page bookmark-able, i.e. we need the ability to directly give a URL with parameters and pull the staff information of the department that we use as the parameter in the URL. The taskflow is simple and is shown below.
click to enlarge

You can download the full example for the complete code, but the essentials of the example are these :
  • The first page lists the depatments table, and the second page gets the staff details for a specific department 
  • The second page is using a sql query (ViewObject) that has the departmentName as a bind parameter.
  • You have the first page(welcome) with the department list(from DEPARTMENTS table in HR schema) displayed on a table, and each row has an <af:commandButton> that has its action attribute set to a navigation rule that directs the flow to the staff details page.
  • The  <af:commandButton> also takes care of passing the parameter to the details page.(code below)
click to enlarge


 Now, for the purpose of the example, the command button has an action listener that is bound to a custom method on the AM that takes the department name as a method parameter and executes the Staff Details VO(this dept name being a bind param for the VO). An <af:setActionListener> sets the dept name corresponding to the button in to a backing bean property. Then in the pageDef for the Department page, an operation binding for the AM method(via DataControl) created and is configured to pickup the backing bean property as a parameter to the AM method. So when the button is clicked: 
  1. The <af:setActionListener>  copies the respective department name to a backing bean property 
  2. Then the actionListener for the button fires executing the method binding, 
  3. The method binding takes the department name from the backing bean property(set in step 1), and uses it as a parameter to the AM method. 
  4. This AM method in turn executes the StaffdetailsVO binding the given department name to it. 
  5. Now the staff details VO contains the staff information for the given department. 
click to enlarge

AM Method - click to enlarge


Then, since the action attribute of the command button was set to a navigation rule to the staff page, the Staff Details page loads displaying the staff VO that has been executed already.
click to enlarge


This is the basic working of the example app. Now for bookmarking, we need the ability to extract the URL parameter from the URL and execute the StaffDetailsVO when loading the Staff Details page. ADF provides exactly this.

In the unbounded taskflow, open the property inspector for the view activity representing the staff detail page(Click on the StaffDetail ViewActivity) and you can see there is a properties section for bookmarking. 
click to enlarge

Here you will see the URL parameter name and value. They basically mean that the framework will take whatever value is in the URL for the given name, and it will populate that value to the destination. The optional method property lets you invoke a custom method after the values have been processed and before the page is loaded to do custom processing, like execute a VO with the param we get  from the URL !      

In this case, name is set to “dept”  and value is set to #{pageFlowScope.deptDetails.departmentName}, which is the departmentName property in the backing bean. So essesntially what the framework does is look at the URL for the parameter named “dept”, take the value for tht parameter and populate the value to the backing bean property . Now we also have a custom method defined as #{pageFlowScope.deptDetails.loadDepartmentDetails} which is a method defined in the backing bean as:

click to enlarge

Since the above method is invoked after processing the parameters, the departmentName property of the backing bean has been set to the value specified by the URL param “dept”. So the call to getDepartment will return the department name that was passed though the URL. The rest is like clockwork, we get the same method binding and execute it. Its worthwhile to note here that the method binding here is created on the Staffdetails page’s pageDef and defaults to the backing bean property departmentName for the department name parameter it needs to execute the Staffdetails VO. So setting the operationBinding parameter manually in this method is not required and is shown for demonstration.


Bookmarking in bounded task-flows
Bounded task-flows are a little bit more tricky and before we dive in to the implementation, consider this: When we say URL accessible, we are essentially saying a publicly available resource reachable by a URL, whereas a bounded taskflow is like a component, which needs a container. So we need a way to make the hidden innards of a bounded taskflow accessible in the form of a URL, with optional parameters. One way to do this to setup/construct the state for a page in the bounded taskflow based on the parameters in the URL that we’ll use. Since pages in bounded taskflows cannot be reached directly(actually they can, but the URL is not human readable and is very snarly) the approach here is to create a "container" page in the unbounded taskflow, and embed our bounded taskflow inside the container as a region. Then we will make that "container" page bookmark-able as described above. This way the clients will always see the "container" page's URL  which would be nice and simple too. The bookmark-able page takes the URL parameters and passes them to to the taskflow as taskflow params and the task flow will be constructed so that it can recreate state based on the input parameters. Bounded taskflows do have a property called URL invoke. This enables the taskflow to be invoked with a URL, and is a good option when you want to expose the whole taskflow to be URL accessible, not just a page within the taskflow. We will not look at this option as we are trying to gain access to a specific page/part of a taskflow without going though the taskflow’s normal flow.

About the example
As the example, we’re going to do the exact same app as before, but time as a bounded taskflow with parameters. In the example, we will see the whole flow implemented, from search and details, and this is not necessary in most cases where you want to make a single page of your application bookmark-able/linkable. This is more of a pattern that I have found that will save time, and keeps code consistent. Develop the whole taskflow as bounded and provide the extra “hooks” to parts of your bounded taskflow from the unbounded one. This way, you can reap all the benefits of a bounded taskflow (like reusability, security), and the taskflow consumer can expose parts of the taskflow as URL accessible.


First we design the bounded taskflow. Since this taskflow takes parameters, the taskflow parameters and properties can be set in the property inspector by clicking on the blank area in the taskflow diagram.
click to enlarge


The taskflow starts with a router which decides which page to see. although this is not required, it demonstrates an approach for structuring task flows that are built for URL accessibility(see the “about the example” box note). The important part is the taskflow parameters, as you can see from the property inspector image above. We’ll see how these parameters are passed to the task flow later on. The router looks at one parameter(viewMode) to decide which page page it wants to show. In the example, it is always the StaffDetails page. Once it determines that the details page is to be loaded, it then invokes a MethodCallActivity, passing the second input parameter, which is the deptName, to the method.
This MethodCallActivity has a page definition/ binding container so that it can invoke the AM method to execute the Deatils VO by passing in the dept Name. To open this pageDef file, right click the MethodCallActivity and choose "Go to Page Definition". Once the VO has been executed, the method call outcome loads the StaffDetails page which simple displays the executed VO as before. To make the page URL accessible, we put a “hook” page in the unbounded taskflow that is Bookmarkable and captures the URL parameters. 
click to enlarge


This page contains the bounded taskflow as a region and passes the URL parameters to the taskflow though the page’s pageDef/binding container.
click to enlarge
Well that's it. You can download the sample workspace with both approaches here:http://myadfnotebook.googlecode.com/files/Bookmarking_with_ADF.zip
[Built on Jdev 11.1.1.3.0, HR schema]
To run the example
You can run

  •  welcome.jspx file to see bookmarking in unbounded taskflow
Once the page is run, for URL accessibility you can use URLs of the form :
http://<host>:<port>/Bookmarking_with_ADF-ViewController-context-root/faces/staffDetails?dept=Marketing

You would also notice that when using "Staff Details" button on the welcome page to navigate to the details page, the URL in the browser contains the parameter. Thats right. The name and value pair that was configured works both ways. When navigating to a bookmark-able page, the URL is constructed based on this name/value pair by evaluating the value and putting it on the URL as a named parameter. Just the way the same value is extracted from the URL.
  • BoundedFlowContainer.jspx for the bounded task flow technique 
The example wont display anything by default, unless you put a deptName named parameter on the URL.
Once the page is run, for the bounded flow you can use the URL of the form :
http://<host>:<port>Bookmarking_with_ADF-ViewController-context-root/faces/BoundedFlowContainer?deptName=IT(or any other dept name)