Sunday, February 27, 2011

ADF Application with multiple Data Sources or Database connections


The Problem: ADF Application with multiple Data Sources or Database connections.

This is a pretty normal use-case, but can be a bit puzzling to new developers. Most apps have more than one database that they connect to. One way of dealing with this is to hide the fact there are multiple databases under the DB layer through the use of synonyms and DBlinks, but sometimes such access is not possible or desirable.  Here I discuss how to use multiple databases from ADF BC.

Solution: Multiple Root Application Modules

The basic element here is the notion of the Root Application Module. For starters, the Root Application Module defines the transactional context.  You need to create two application Modules, each one connecting to its own Database. You could also connect the very same application module to two different databases if you need to, more on that later.  Nesting one application module inside another to get access to it won’t work as nested application modules share the same root.
So the way to do this is to create a *new* _Root_ Application Module directly from the BC4J configuration. This ensures that the connection associated with that Application module’s configuration is used. The ADF model layer usually takes care of handling instances of you Application Modules, and here, you are doing it manually. This brings some risk, and be careful to release the Application Module after use.

Create Project

Start out by creating one or more model projects in your application. In most cases you’ll only require one project, but if you need to create the ADF BC objects from database tables, you will likely need two projects so you don’t have to switch connections in the same project at design time. The “Connection” you see in the Project Properties > Business Components (click on Business Components) is used only during design time to generate ADF BC objects from a DB. An Application Module’s Configuration(bc4j.xml) defines the connection it uses at run time .
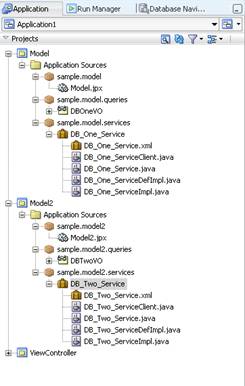
Figure 1
The two model projects will house the Application Modules that connect to the two different Databases.

Configuration

Once the model projects are created, open the Configuration dialog box for the Application modules. The connection an Application Module uses at runtime is defined in the Application Module’s configuration and not the project properties.


The Manage Configurations dialog lists the Configurations available for that AM. The configuration for an AM encapsulates the parameters for the AM like the connection it uses. The configuration name is important as we’ll later use it to identify a particular named configuration and use that named configuration to create an Application Module instance. To specify the parameters inside the named configuration, select the configuration name, and choose Edit
  

I’m assuming that a Data Source will be used. If using a JDBC URL, the steps are the same. A valid Data Source name is defined for the first DB and the steps should be repeated the same for the second Application Module connecting to the second DB. These Data sources need to be available at runtime, so either they need to exist in the Application server you are deploying to, or you need to deploy them as part of your application.  I’m using the automatic deployment of DS provided by JDeveloper (this might not be suitable for production) so JDeveloper automatically provides a Data Source entry in this wizard based on the connections defined at the Application or IDE level. These Data sources have name that is the connection name appended with the two letters ‘DS’.   After editing the Data source, you have effectively created a Configuration called DB_One_ServiceLocal  (see screenshot) that uses the Data Source /jdbc/database_1DS  . This configuration can now be used anytime to create a root application module with the configured parameters (like an alternate Data Source ).

A note about Data Sources

See this for how to deploy a Data source manually.
This explains how to make use of JDeveloper’s automatic data source deployment.


Here is where most people get puzzled. After creating two Application Modules, you would be tempted to nest your second application module inside your first. This does not work, as the transaction context is defined for the rootapplication module, and when you nest, the root application module does not change, and so the connection does not change. The connection used is the root Application Module’s connection. The solution is to create a new RootApplication Module directly from the named BC4J configuration we created. This being a root application module on its own ensures that the connection associated with that Application module’s configuration is used. 

The Code

The following screenshot shows the classes generated by JDeveloper, nothing out of the ordinary.

The second app module exposes a method on its client interface that the first application module invokes.
Here is the method the second AM exposes on its client interface:
  1. /** 
  2.    * Method exposed by this AM to provide the query results from its VO. 
  3.    * Since this AM's configuration connects it to the second database, 
  4.    * the VO query is executed agaist that DB 
  5.    * 
  6.    * @return 
  7.    */  
  8.    public String querySecondDB()  {  
  9.       getDBTwoVO().executeQuery();  
  10.       return ((DBTwoVORowImpl) getDBTwoVO().first()).getSampledata();  
  11.    }  
   
Now in order for the first application module t access and query the second data base, it creates a new root application module instance of the second application module using the named configuration that connects it to the second database. Once the new root application module instance is obtained, the exposed method is invoked and depending on the scenario, the root application module instance is released. The method used is Configuration. createRootApplicationModule()
  1. public String queryMulipleDBs(){  
  2.     getDBOneVO().executeQuery();  
  3.     String fromDBOne;  
  4.     String fromSecondDB;  
  5.     fromDBOne = ((DBOneVORowImpl) getDBOneVO().first()).getSampledata();  
  6.     // Create new root AppModule from the named Configuration  
  7.     DB_Two_Service service =  (DB_Two_Service)Configuration.createRootApplicationModule("sample.model2.services.DB_Two_Service""DB_Two_ServiceLocal");  
  8.     // Query the second DB  
  9.     fromSecondDB = service.querySecondDB();  
  10.     Configuration.releaseRootApplicationModule(service,true); //releases and removes the AppModule  
  11.     return "from first DB : " + fromDBOne + " from second DB : " +fromSecondDB;  
  12.   
  13.   }  
   
If you have the queryMulipleDBs() method of the first Application Module exposed on its client interface, you can use the Business components test to validate the whole thing since with 11g, the Business components tester can work with Data sources as well.


A note about multiple Projects and Application Modules

Here we used a separate project and an Application Module to connect to our second DB. This however is a personal preference, I like this because it keeps the code easily readable and separates the artifacts cleanly. The real crux of the technique is an alternative root application module using a particular configuration. So ineffect you could have two ApplicationModules in the same project with thier configurations connecting to two DBs or you could have the same ApplicationModule definition with just an alternative Configuration(that connects to the other DB) and instantiate a new instance of the same ApplicationModule definition as a root AM, with the alternate Configuration using the same code. 
  1. Configuration.createRootApplicationModule(  
  2.                                   "sample.model.services.DB_One_Service",  
  3.                                   "CONFIG_WITH_A_SECOND_DATASOURCE");  
So here we have the first AM instantiating another root instance of itself with another Configuration, one that connects to another DataSource.

Saturday, February 26, 2011

TROUBLESHOOTING: "Because of inactivity, your session has timed out and is no longer active..."


Problem
The following error might occur will navigating to your app.


Solution
One of the reason might be that org.apache.myfaces.trinidad.CLIENT_STATE_MAX_TOKENS value is not great enough.

Add the following param in your web.xml and setting according to yourneeds:

not working on with childCreation="deferred"


You should be careful while using <af:setPropertyListener> on <af:popup>. There is a known limitation when you use <af:setPropertyListener> with 'popupFetch' type to initialize the properties/parameters for a <af:popup>. The relevant jsf snippet may look like as shown in the following diagram.


 <af:popup id="p1" contentDelivery="lazyUncached"  
       childCreation="deferred">  
  <af:setPropertyListener from="'check'" to="#{requestScope.params}"  
    type="popupFetch"/>  
  <af:dialog id="d2" title="Check">  
   <af:outputText value="Param from the caller: #{requestScope.params}"  
    id="ot2"/>  
   </af:dialog>  
 </af:popup>    

When you run this page, you may notice that the setPropertyListener with a popupFetch type is not getting called for the first time, and the same works without issues from next time onwards.

What goes wrong here?

Let me try to summarize the reason for this behavior. In the above jsf snippet, <af:setPropertyListener> resides inside the popup body which is not available/processed when the parent page renders for the first time because of the deferred 'child creation' settings (childCreation ="deferred") for the popup. With this deferred configuration popup body is processed when you really ask for it. Please note that, af:setPropertyListener is expected to be evaluated/processed during the Apply Request Values phase in JSF life cycle which may happen much before the Render Response phase. When user opts to view popup, reuest reaches server and JSF lifecycle starts. As there is no popup body at this stage, there is no af:setPropertyListener tag for processing at Apply Request Values phase. Later in the JSF life cycle, popup body is processed at Render Response phase. Apparently next request for showing popup may have fully processed popup body in place, and everything may work as expected at this time.


The work around solution is to use the popupFetchListener method to establish state(pass parameters) instead of <af:setPropertyListener>. If you modify the above jsf snippet as shown below, this use case will work.

 <af:popup id="p2" contentDelivery="lazyUncached"  
       childCreation="deferred"  
       popupFetchListener="#{TestBean.popupFetchAction}">  
  <af:dialog id="d3" title="Check">  
   <af:outputText value="Param from the caller: #{requestScope.params}"  
             id="ot3"/>  
  </af:dialog>  
 </af:popup>  
 public class TestBean {  
  public void popupFetchAction(PopupFetchEvent popupFetchEvent) {  
   ADFContext.getCurrent().getRequestScope().put("params", "check");  
  }  
 }   

Globally setting the Row Fetch Limit for all ViewObjects


There is an interesting feature available with 11gR1PS3(11.1.1.4.0) release which may help you to set a default 'row fetch limit' for all ViewObjects at application level. This is very useful to avoid expensive table scan if you don't have maxfetchsize defined for individual ViewObjects. Apparently, this 'global setting' fits well for those ViewObjects where each query execution may result in large number of records. Please note that, even the 'row count' query issued by the framework may also result in performance issues if the table is having huge chunks of data.


How do you set the 'Row Fetch Limit' globally?

This value can be configured using 'rowLimit' under <adf-adfm-config> section of <adf-config> file from your application.

<adf-adfm-config xmlns="http://xmlns.oracle.com/adfm/config">
<defaults useBindVarsForViewCriteriaLiterals="true" rowLimit="10000"/>
   ...
</adf-adfm-config>

If you would like to edit this configuration visually, then please use the <adf-config> editor to key in value for 'Row Fetch Limit', as shown in the following screen shot.


How does 'Row Fetch Limit' help to limit the fetch size at runtime?

From the UI perspective, when the user scrolls down beyond the 'row fetch limit' the run time would generate oracle.jbo.RowLimitExceededWarning and the same would be displayed as a message dialog to the user. The same exception is thrown if you try to access the row(s) programmatically as well, exceeding the fetch size.

oracle.jbo.RowLimitExceededWarning: JBO-25089: View object AppModule.EmployeesView1 attempted to fetch rows beyond the row limit
  at oracle.jbo.server.ViewObjectImpl.createRowFromResultSet(ViewObjectImpl.java:5765)
  at oracle.jbo.server.ViewObjectImpl.createInstanceFromResultSet(ViewObjectImpl.java:5588)
  at oracle.jbo.server.QueryCollection.populateRow(QueryCollection.java:3528)


How do you override the global Row Fetch Limit for a specific ViewObject?

It is always possible to override the global row fetch limit for specific ViewObject(s) based on your use cases. There are two possible approaches,

1. Specify maxfetchsize for the ViewObject. You can see this option under ViewObject's tuning section in the editor window.

2. Override ViewObjectImpl::getRowLimit() from your ViewOblectImpl to return -1.

/**
* A limit may be applied on the number of rows in a query collection. When
* a new row is requested from the database and the limit is exceeded a
* warning is raised. By default the limit is configured as an application
* wide setting in adf-config.xml.
* @return a limit on the number of rows in a query collection. If no row limit is enforced
*/
@Override
protected long getRowLimit()
{
  return -1;
}

Wednesday, February 23, 2011

How to prevent delete on master if child record exists in Oracle ADF


Hi,

In this post we will see the declarative way to stop deletion of Master record if child record exists in the database without writing much code.

In this example we have only Departments entity and Employee view object i created a ViewLink between DepartmentsView and EmployeesView and accessing the ViewAccessor in Departments entity.

Later i override the remove() method as follows


  public void remove() {
    RowIterator ri = getEmployeesView();
    int count = ri.getRowCount();
    if (count > 0) {
      throw new JboException("You cannot delete this record, Child record exists!!!");
    } else {
      super.remove();
    }

  }

Download the sample code.

How to create Breadcrumbs in Oracle ADF


In this post we will see how to create a bread crumbs in Oracle ADF. I feel breadcrumbs are not the very visible option in ADF as like in Oracle APEX.

So here is the simple video and you can download the example in the video from here


Happy Jdeveloping,
SARAVANAN